The character consistency guide
How to Keep the Same AI Character Across Different Images
By Amira Alessi · AI Advantage Group
Keeping an AI character recognizable is not just about writing a longer prompt. You need a fixed identity description, an approved visual reference, and a habit of checking new images against that reference.
The simplest approach is to keep the character’s identity fixed and change only the scene. That means a new outfit, location, or expression should not become a new face.
This guide uses Amira Alessi’s character-reference sheets to show how to organize that workflow. It follows the method in The AI Character Consistency Kit, a free PDF available when you enter your name and email.
Why does an AI character’s face keep changing?
Image generators respond to the descriptions and references you provide. If you rewrite the character’s permanent features each time, you give the generator a moving target. Even with the same description, new angles, expressions, or complicated scenes can produce results that drift from your reference.
A repeatable workflow helps you spot and reduce that drift. It does not guarantee a perfect match in every image; you still need to review the results.
1. Write an identity profile you can reuse unchanged
Before creating more scenes, write down the character’s permanent details:
- Adult age and background
- Skin complexion and undertones
- Face shape, cheekbones, jawline, and nose
- Eye color and shape
- Eyebrow shape and density
- Hair color, texture, cut, length, and part
- Lips and characteristic expression
- Body proportions
- Distinguishing features, such as freckles or tattoos
Be specific where it matters. “Short hair” leaves room for interpretation; a description that says where the cut ends gives you something concrete to check.
Save this profile in a document and copy the same wording into future prompts. Keep temporary choices—today’s outfit, location, and pose—outside the identity paragraph.
Amira example: Use her approved character sheet as the comparison point. When reviewing a new image, ask whether the face structure, hairstyle, complexion, and proportions still resemble the reference—not whether the dress or background matches.
2. Approve a clear master portrait
Choose a front-facing image in which you can inspect the character’s face clearly. Save it at full resolution, alongside the identity profile.
If your image tool supports reference images or a character-reference feature, attach that approved portrait when creating new scenes. Follow the tool’s own instructions: a written prompt does not create a reference feature where none exists.
Avoid replacing the master portrait simply because a later image looks attractive. First check whether the new image still represents the identity you approved.
3. Build a reference sheet with different angles
A front-facing portrait gives you one view. A reference sheet helps you compare the character across angles, expressions, and full-body views.
The kit’s nine-panel layout includes:
- A front-facing neutral portrait
- A three-quarter view toward camera-left
- A three-quarter view toward camera-right
- A left-side profile
- A right-side profile
- A natural smile
- A laughing expression
- A full-body front view
- A full-body three-quarter view
Keep the background, lighting, and reference outfit simple so differences in identity are easier to see.
Look at Amira’s example: Her reference sheet presents multiple views together. Compare the profile panels with the front-facing portrait, then check the expression and full-body panels. Does each still read as the same character?
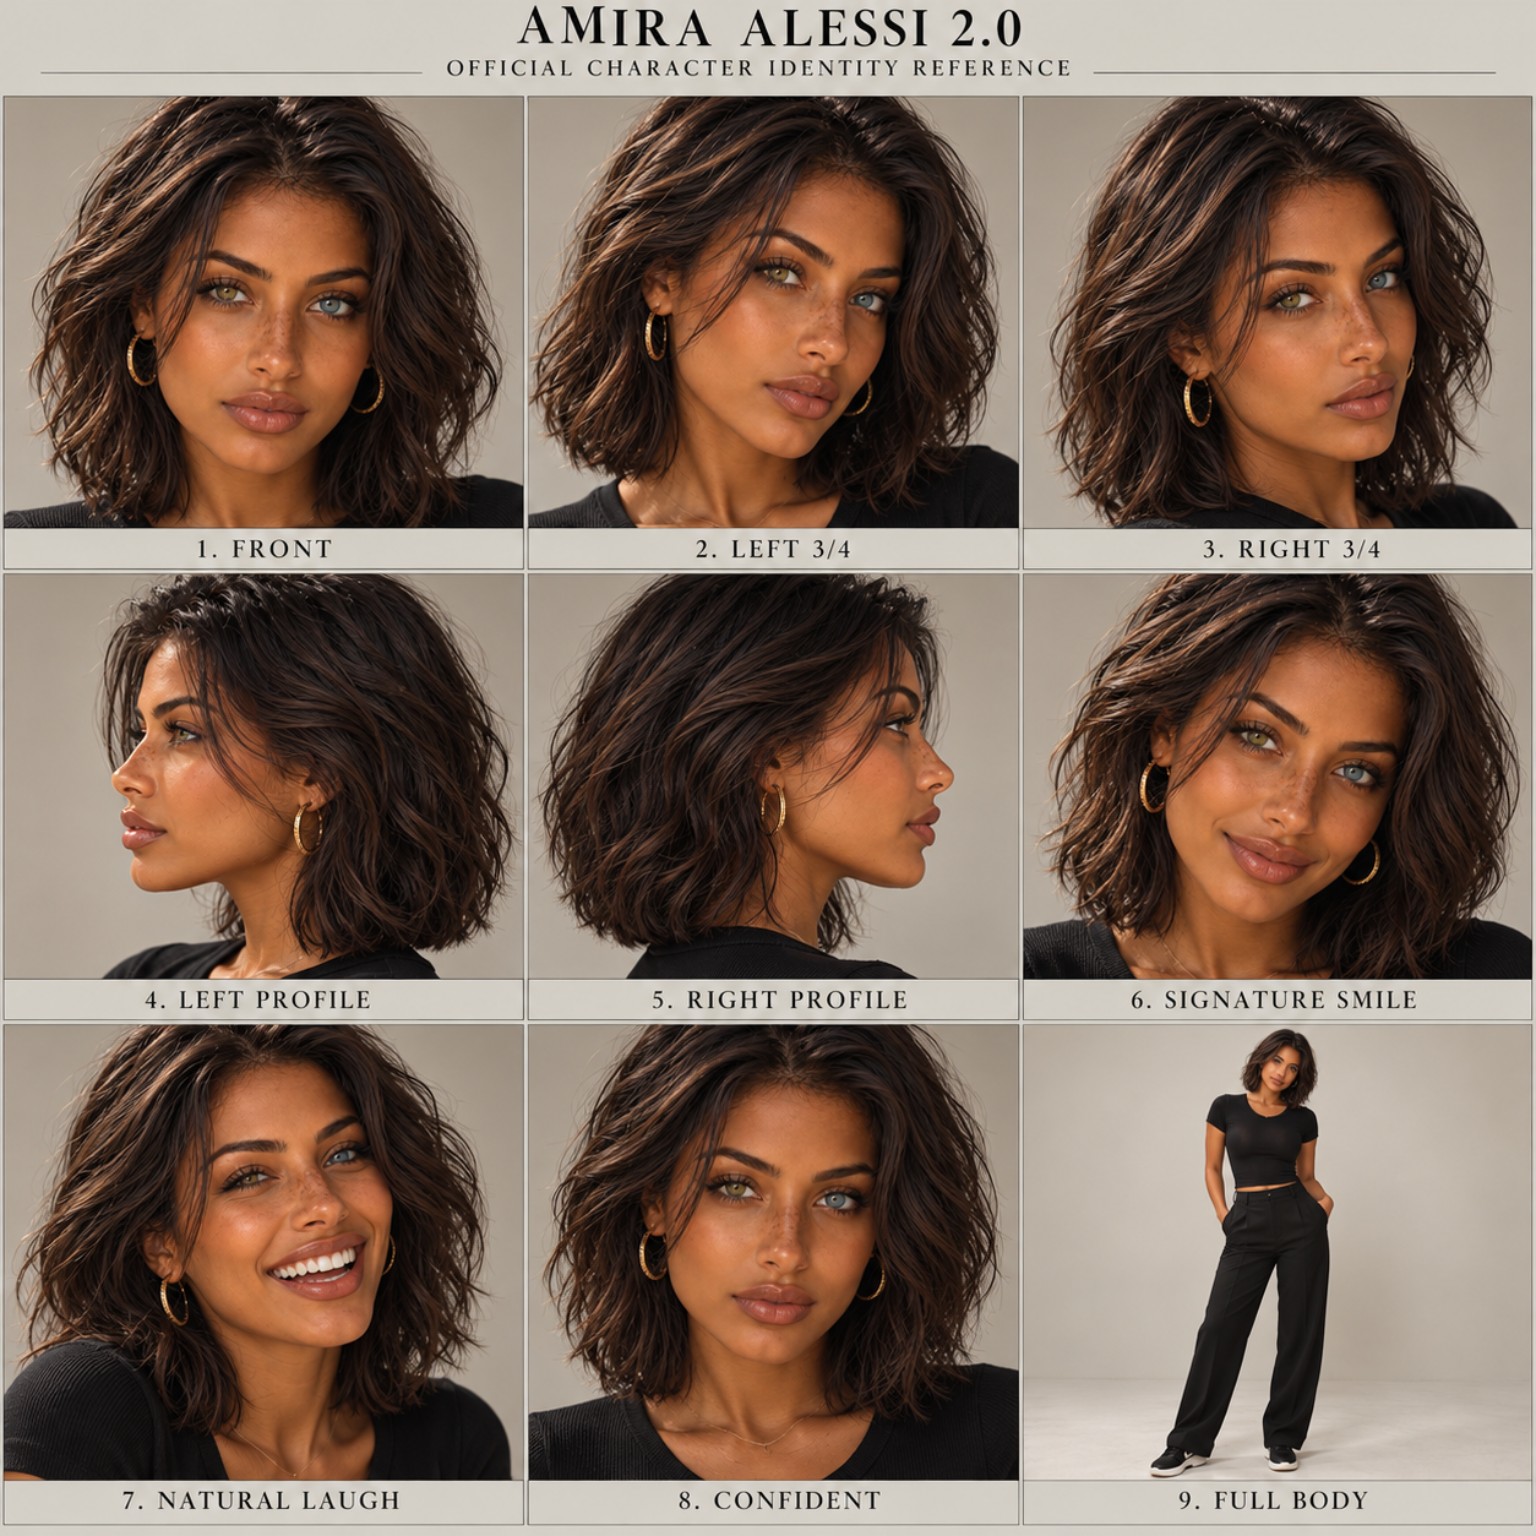
If a generator struggles with nine panels, start with a smaller set of portraits. Approve the individual images and assemble the sheet in an editor rather than accepting an inconsistent grid.
4. Change the scene, not the identity
Once the portrait and sheet are approved, keep reusing them. Add scene instructions below your unchanged identity paragraph.
For example, you might place the same character in a café, a boardroom, or on a Mediterranean terrace. These are scene changes—not reasons to rewrite her face, hair, or body proportions.
Here is an illustrative scene add-on adapted from the kit:
Using the approved character identity and attached master reference, generate a new photorealistic image of [NAME] at [LOCATION], wearing [OUTFIT], doing [ACTION]. Camera: [FRAMING AND ANGLE]. Lighting: [LIGHTING]. Mood: [MOOD]. Keep permanent facial and physical features consistent with the identity lock. Change only the scene-specific details.
Use the attachment instruction only when you actually attach a reference and your tool supports it. This example is a reusable structure, not a claim that a particular Amira image was generated with these exact words.
5. Run a 60-second consistency check
Before publishing a new image, compare it with the approved master:
- Does the face resemble the reference?
- Are skin depth and undertones consistent, allowing for the lighting?
- Are eye colors correct, including anatomical left and right where relevant?
- Is the hair’s color, texture, cut, and length unchanged?
- Are distinguishing features in the right places?
- Are body proportions realistic and stable?
- Can you recognize the character without reading the name?
For a reference sheet, also check that all nine panels are clear and show the same identity.
The kit recommends revising or regenerating a sheet if two or more checks fail. If only one panel is wrong, repair that panel rather than redefining the character.
What to try when the character still drifts
The face looks different: Return to the approved portrait, use it as the visual reference where supported, and simplify the scene.
Hair length changes: Specify where the cut ends and keep that wording unchanged.
Eye colors switch sides: Describe anatomical left and right explicitly, then inspect the result rather than trusting the instruction alone.
Body proportions change: Reuse the same proportion description and include a neutral full-body reference.
Get the free AI Character Consistency Kit
You do not need to build the workflow from a blank page. The kit includes a fill-in identity profile, a master reference-sheet prompt, the nine-panel layout, a quality checklist, and a reusable scene workflow.
Get The AI Character Consistency Kit free →
Enter your name and email on Amira’s website to download the PDF.